
实现微信小程序之授权登录
时间:2021-04-13
来源:互联网
标签:

前言:由于微信官方修改了 getUserInfo 接口,所以现在无法实现一进入微信小程序就弹出授权窗口,只能通过 button 去触
发。
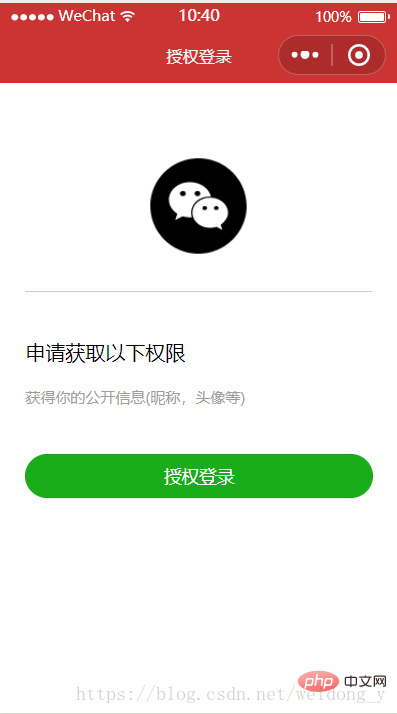
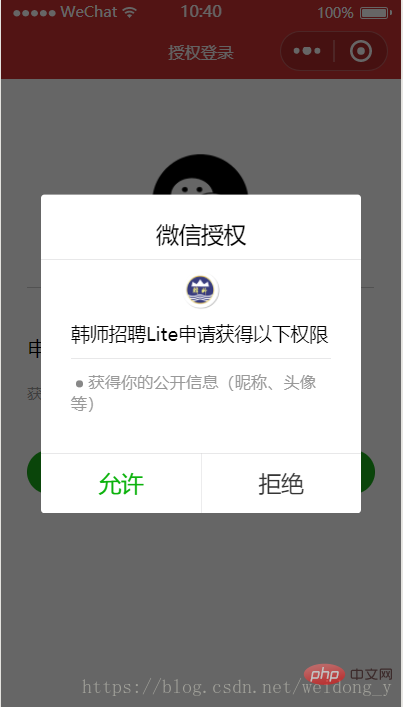
1.实现思路
自己写一个微信授权登录页面让用户实现点击的功能,也就是实现了通过 button 组件去触发 getUserInof 接口。在用户进入微
信小程序的时候,判断用户是否授权了,如果没有授权的话就显示下面“界面简介”的第一个图,让用户去执行授权的操作。如
果已经授权了,则直接跳过这个页面,进入首页。
相关免费学习推荐:微信小程序开发
2.界面简介
3.源码
login.wxml
<view wx:if="{{canIUse}}">
    <view class='header'>
        <image src='/images/wx_login.png'></image>
    </view>

    <view class='content'>
        <view>申请获取以下权限</view>
        <text>获得你的公开信息(昵称,头像等)</text>
    </view>

    <button class='bottom' type='primary' open-type="getUserInfo" lang="zh_CN" bindgetuserinfo="bindGetUserInfo">
        授权登录
    </button>
</view>

<view wx:else>请升级微信版本</view>
login.wcss
.header {
    margin: 90rpx 0 90rpx 50rpx;
    border-bottom: 1px solid #ccc;
    text-align: center;
    width: 650rpx;
    height: 300rpx;
    line-height: 450rpx;
}

.header image {
    width: 200rpx;
    height: 200rpx;
}

.content {
    margin-left: 50rpx;
    margin-bottom: 90rpx;
}

.content text {
    display: block;
    color: #9d9d9d;
    margin-top: 40rpx;
}

.bottom {
    border-radius: 80rpx;
    margin: 70rpx 50rpx;
    font-size: 35rpx;
}
login.json
{
"navigationBarTitleText": "授权登录"
}
login.js
代码的 wx.request 是我项目与后台的一些交互,可直接删除掉。
需要修改的地方:
记得自己补上 wx.switchTab 接口中的 url 属性,这是授权成功后跳转的页面路径,由于我的首页是 tarBar 页面,所以这里用
wx.switchTab ,如果不是 tarBar 页面的话,可以用 wx.navigateTo 和 wx.redirecTo 去跳转
Page({
data: {
//判断小程序的API,回调,参数,组件等是否在当前版本可用。
canIUse: wx.canIUse('button.open-type.getUserInfo')
},
onLoad: function () {
var that = this;
// 查看是否授权
wx.getSetting({
success: function (res) {
if (res.authSetting['scope.userInfo']) {
wx.getUserInfo({
success: function (res) {
//从数据库获取用户信息
that.queryUsreInfo();
//用户已经授权过
wx.switchTab({
url: ''
})
}
});
}
}
})
},
bindGetUserInfo: function (e) {
if (e.detail.userInfo) {
//用户按了允许授权按钮
var that = this;
//插入登录的用户的相关信息到数据库
wx.request({
url: getApp().globalData.urlPath + 'hstc_interface/insert_user',
data: {
openid: getApp().globalData.openid,
nickName: e.detail.userInfo.nickName,
avatarUrl: e.detail.userInfo.avatarUrl,
province:e.detail.userInfo.province,
city: e.detail.userInfo.city
},
header: {
'content-type': 'application/json'
},
success: function (res) {
//从数据库获取用户信息
that.queryUsreInfo();
console.log("插入小程序登录用户信息成功!");
}
});
//授权成功后,跳转进入小程序首页
wx.switchTab({
url: ''
})
} else {
//用户按了拒绝按钮
wx.showModal({
title:'警告',
content:'您点击了拒绝授权,将无法进入小程序,请授权之后再进入!!!',
showCancel:false,
confirmText:'返回授权',
success:function(res){
if (res.confirm) {
console.log('用户点击了“返回授权”')
}
}
})
}
},
//获取用户信息接口
queryUsreInfo: function () {
wx.request({
url: getApp().globalData.urlPath + 'hstc_interface/queryByOpenid',
data: {
openid: getApp().globalData.openid
},
header: {
'content-type': 'application/json'
},
success: function (res) {
console.log(res.data);
getApp().globalData.userInfo = res.data;
}
});
},
})以上就是实现微信小程序之授权登录的详细内容,更多请关注php爱好者其它相关文章!
-
 C#CheckedListBox控件用法详解(属性、方法、事件) 时间:2025-12-12
 -

-
 minidump.dmp是什么文件?怎么打开?可以删除吗? 时间:2025-12-12
 -
 teniodl.exe是什么进程?怎么彻底关闭? 时间:2025-12-12
 -
 display:block是什么意思?display:block属性的作用? 时间:2025-12-12
 -
 什么是updater.exe?怎么删除?如何关闭? 时间:2025-12-12
今日更新
-
 2026最新poipiku官网中文版入口-poipiku网站怎么打开
阅读:18
-
 动漫国纯净版下载入口-无广告安卓版1.0.0.7一键获取最新下载入口
阅读:18
-
 婆媳关系的梗是什么梗 揭秘当代家庭最火相处段子背后真相
阅读:18
-
 THETA币价格走势解析:关键影响因素及未来趋势预测
阅读:18
-
 快手网页版一键直达-快手网页版官方入口链接
阅读:18
-
 樱花风车动漫app官方版下载入口一键获取-樱花风车动漫软件安卓免费版高速下载入口
阅读:18
-
 yy漫画官方登录入口免费 2025最新网页版直达
阅读:18
-
 欧易平台THETA币视频流应用优势解析与使用指南
阅读:18
-
 漫蛙2最新版下载入口-漫蛙2手机版高速下载
阅读:18
-
破补是什么梗?揭秘网络热词背后的搞笑真相,看完秒懂!
阅读:18