
uni-app引入插件的方法有哪些
时间:2021-09-26
来源:互联网
标签:
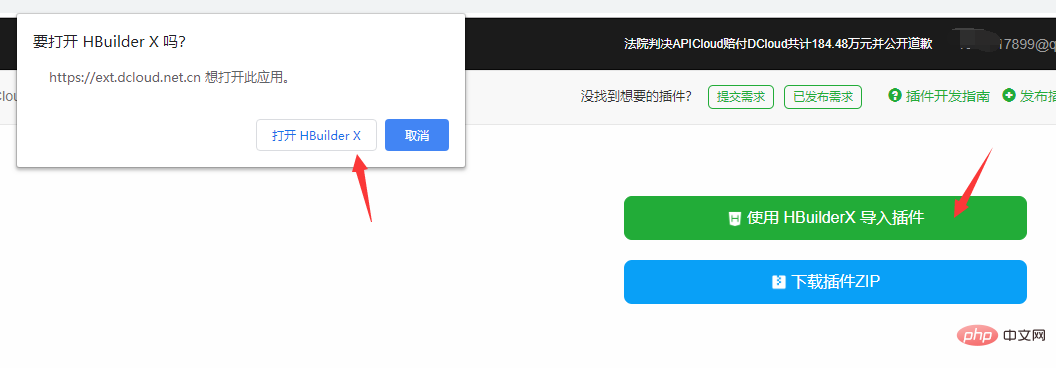
今天PHP爱好者为您带来uni-app引入插件的方法:1、在uni-app的官网上找到需要的插件;2、点击右侧顶部的【使用HX导入】;3、选择要导入到的一个项目中即可。希望对大家有所帮助。

本文操作环境:Windows7系统、uni-app2.5.1版,DELL G3电脑
uni-app怎么引入插件?
在uni-app中快速导入自己需要的插件
在uni-app的官网上;找到自己需要的插件;
然后点击右侧顶部的这一步的前提是你必须要用自己的账好登录;
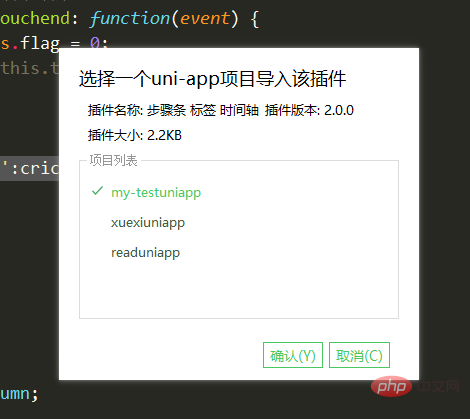
然后选择你要导入哪一个项目 然后就可以了
插件
<template>
	<!-- 获取一个数组,结构为[{date:'时间',info:'内容内容'}] -->
	<!-- @click事件返回点击标签元素的索引值 第一项为0 -->
	<!--

	 在uni-app中快速导入自己需要的插件
	 在uni-app的官网上;找到自己需要的插件;
	 然后点击右侧顶部的这一步的前提是你必须要用自己的账好登录;
	 然后选择你要导入哪一个项目 然后就可以了
	 -->
	<view class="bg">
		<view class="steps">
			<view class="steps_item" v-for="(i, index) in infoList">
				<view class="s_r">
					<view class="line" :style="{backgroundColor:index != 0?backgroundColor:'rgba(0,0,0,0)'}"></view>
					<view class="index" :style="{backgroundColor:backgroundColor,color:color}">
						{{ index + 1 }}
					</view>
					<view class="line" :style="{backgroundColor:index != infoList.length-1?backgroundColor:'rgba(0,0,0,0)'}"></view>
				</view>
				<view class="s_l">
					<view class="info_item" @tap="topage(index)">
						<text>{{ i.date }}</text>
						<view :style="{WebkitLineClamp:lineNum!=0?lineNum:''}">{{ i.info }}</view>
					</view>
				</view>
			</view>
		</view>
	</view>
</template>

<script>
	export default {
		name: 'YSteps',
		props: {
			infoList: {
				type: Array,
				default: []
			},
			color: {
				type: String,
				default: '#fff'
			},
			backgroundColor: {
				type: String,
				default: '#ff3838'
			},
			lineNum: {
				type: Number,
				default: 0
			}
		},
		data() {
			return {};
		},
		onLoad(e) {
			//获取列表
		},
		methods: {
			topage(e) {
				this.$emit('click', e);
			}
		}
	};
</script>

<style lang="scss" scoped>
	page {
		background-color: #f2f2f2;
	}

	.bg {
		margin: 20upx 0;
		background-color: #f2f2f2;
		display: flex;
	}

	.steps {
		display: flex;
		flex-direction: column;

		.steps_item {
			display: flex;

			.s_r {
				padding: 0 20rpx;
				display: flex;
				flex-direction: column;
				align-items: center;

				.line {
					flex: 1;
					width: 5rpx;
					background-color: #fff;
				}

				.index {
					width: 40rpx;
					height: 40rpx;
					font-size: 12px;
					text-align: center;
					line-height: 40rpx;
					border-radius: 50rpx;
				}
			}

			.s_l {
				display: flex;
				flex-direction: column;
				padding: 20rpx 0;

				.info_item {
					background-color: #FFFFFF;
					margin-right: 30upx;
					border-radius: 10upx;
					display: flex;
					flex-direction: column;
					justify-content: center;
					padding: 30upx;
					box-shadow: 0 10rpx 30rpx #ddd;
					width: 580rpx;

					text {
						font-size: 18px;
						font-weight: 500;
						color: rgba(51, 51, 51, 1);
						line-height: 25px;
					}

					view {
						font-size: 14px;
						font-weight: 400;
						color: rgba(102, 102, 102, 1);
						line-height: 20px;
						overflow: hidden;
						text-overflow: ellipsis;
						display: -webkit-box;

						flex-direction: column;
					}
				}

				.info_item:active {
					background-color: #f4f4f4;
				}
			}
		}
	}

	// .steps {
	// 	display: flex;
	// 	flex-direction: column;
	// 	margin: 0 30upx;

	// 	.steps_item {
	// 		display: flex;
	// 		align-items:center ;
	// 		background-color: #fff;
	// 		margin-top: 10rpx;
	// 		.s_r {
	// 			display: flex;
	// 			flex-direction: column;
	// 			align-items: center;
	// 			height: 100%;
	// 			background-color: #f3f;
	// 			flex: 1;
	// 			view {
	// 				height: 100%;
	// 				display: flex;
	// 				flex: 1;
	// 				height: 100%;
	// 				width: 5upx;
	// 			}

	// 			text {
	// 				display: flex;
	// 				flex-direction: column;
	// 				align-items: center;
	// 				width: 40upx;
	// 				line-height: 40upx;
	// 				height: 40upx;
	// 				border-radius: 50%;
	// 				background-color: #ff3838;
	// 				color: #ffffff;
	// 				font-size: 10px;
	// 			}
	// 		}
	// 	}
	// }

	// .info_list {
	// 	display: flex;
	// 	flex-direction: column;
	// 	flex: 1;

	// 	.info_item {
	// 		background-color: #fff;
	// 		height: 200upx;
	// 		margin: 20upx 0;
	// 		margin-right: 30upx;
	// 		border-radius: 10upx;
	// 		display: flex;
	// 		flex-direction: column;
	// 		justify-content: center;
	// 		padding: 0 30upx;

	// 		text {
	// 			font-size: 18px;
	// 			font-family: PingFangSC-Medium, PingFang SC;
	// 			font-weight: 500;
	// 			color: rgba(51, 51, 51, 1);
	// 			line-height: 25px;
	// 		}

	// 		view {
	// 			font-size: 14px;
	// 			font-family: PingFangSC-Regular, PingFang SC;
	// 			font-weight: 400;
	// 			color: rgba(102, 102, 102, 1);
	// 			line-height: 20px;
	// 			overflow: hidden;
	// 			text-overflow: ellipsis;
	// 			display: -webkit-box;
	// 			-webkit-line-clamp: 2;
	// 			flex-direction: column;
	// 		}
	// 	}

	// 	.info_item:active {
	// 		opacity: 0.6;
	// 	}
	// }
</style>
使用
<view style="background-color: #f2f2f2;padding-top: 100rpx;">
	 <YSteps lineNum='0' color='#fff' backgroundColor='#000fff' :infoList='list'></YSteps>
</view>

import YSteps from '../../components/Y-Steps/Y-Steps.vue'

list: [
					{
						date: '2020-1-4',
						info: '我一次来到这个这个阅读网站'
					},
					{
						date: '2020-2-4',
						info: '我写下了自己的第一篇文章'
					},
					{
						date: '2020-3-4',
						info: '我的文章超阅读量过了10W'
					},
					{
						date: '2020-4-4',
						info: '我成为写作达人'
					},
],

components:{
      YSteps
}
以上就是uni-app怎么引入插件的详细内容,更多请关注php爱好者其它相关文章!
-
 电脑出现normal.dotm错误怎么办?解决方法是什么? 时间:2025-12-15
 -
 normal.dotm在哪个文件夹里 如何删除normal模板 时间:2025-12-15
 -
 d3dll.dll不能启动怎么办?怎么修复? 时间:2025-12-15
 -
 psrpc.dll缺失的原因及解决方法 时间:2025-12-15
 -
 JavaScript插件Lightbox.js用法详解 时间:2025-12-15
 -
 isalpha()函数在Python中的用法详解 时间:2025-12-15
今日更新
-
 抖音网页版登录入口-抖音网页版免安装一键即用
阅读:18
-
 皮鞭梗是什么梗 揭秘网络热词皮鞭梗的搞笑来源和用法
阅读:18
-
 原神云游戏网页版秒玩入口-原神网页版极速畅玩-华军软件园
阅读:18
-
 如何高效接收欧易平台最新活动通知与优惠信息
阅读:18
-
 夸克网页版浏览器入口-无痕浏览模式-夸克网页版浏览器入口-隐私保护功能
阅读:18
-
 蛋仔派对云游戏免下载畅玩入口-2026最新蛋仔派对网页版极速秒玩通道
阅读:18
-
 欧易平台项目方合作筛选标准与流程详解
阅读:18
-
想知道皮带是什么梗?揭秘网络热词背后的搞笑真相,点击了解最新流行语!
阅读:18
-
 绯月仙行录官网在哪-绯月絮语正版入口
阅读:18
-
 在线免费看漫画入口-网页版漫画在线免费阅读直达
阅读:18